
Ices dams form when snow on a roof melts, runs to a colder section, and freezes. Drainage blockages cause water to pool behind the ice, which can lead to leakage. Before the next winter, I suggest you find what is warming your roof and not starting by adding more attic vents or replacing shingles. Removing the ice may only provide a temporary solution. Addressing the roof warming is key to solving the problem.[1][3]
If water is already entering your home, containment and restoration of your possessions is important. Place a container under a dripping location only if you are not standing under a ceiling that is at risk of collapsing. The edge of the roof is dangerous and people should stay away while you contact a roofing contractor who is experienced with dealing with ice dams. Do not climb on the roof, chop ice or set up heaters.[1][3]
The melting starts uphill from the ice
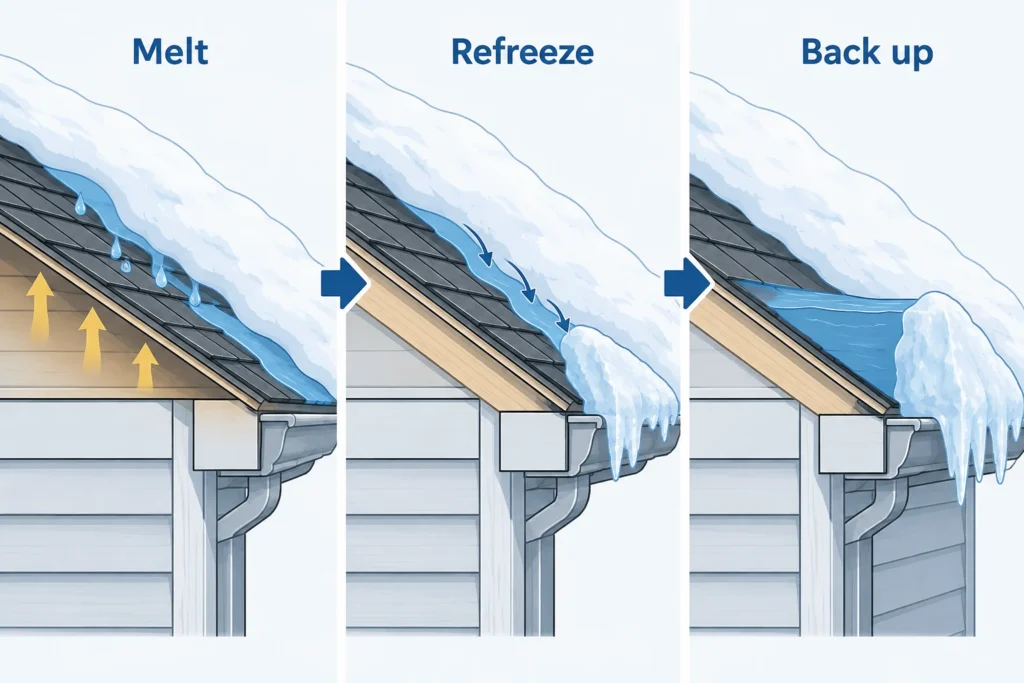
People assume that because the air is freezing that the entire roof is freezing. Heat loss from the home can melt lower portions of the snow while upper portions of the roof can still be freezing. The snow helps retain heat and insulate the roof. The overhang beyond your living space can stay cold enough to freeze the melted water.[1][3]
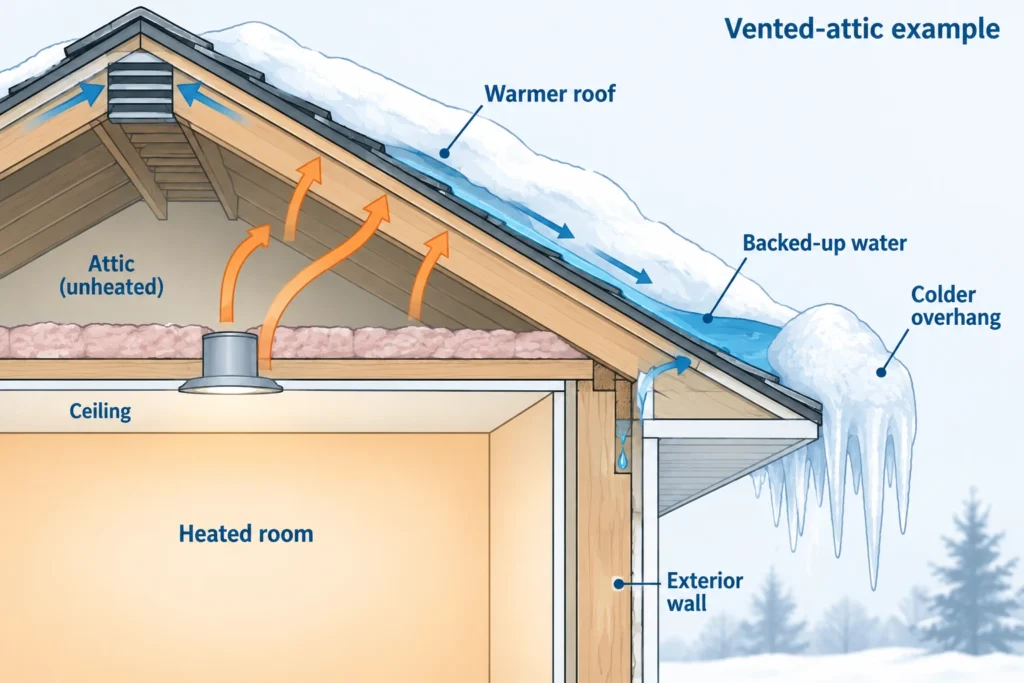
The ice ridge holds water uphill from it. Shingles are designed to shed water, but if the water backs up, it can reach overlaps and details of the roof that are not watertight. It can then wet the sheathing, insulation, walls and ceiling. It can travel before showing itself and then eventually leak into a building. Your ceiling stain may not be above the location of the water entry.[1][3]
I’d be wary of anyone diagnosing “not enough ventilation” from an icicle photo. Icicles show melting and refreezing, not a particular defect, or even proof of a leak. Ceiling air leaks, heat passing through poorly insulated areas, warm attic equipment, and sunlight can produce similar-looking ice. The photo is a useful starting point, not a prescription.[1][3][4]
Give the investigation a location and a timeline
Picture me in an imagined house, moving a laundry basket away from a fresh ceiling drip below the second-floor bathroom. I’m irritated: the roof edge was cleared last winter, and here’s the bucket again. Rather than ordering another blanket attic upgrade, I mark the drip and ice locations on a sketch and ask for the bathroom’s ceiling and exhaust route to be examined. That location gives us a question, not an answer.
Investigating potential sources of ice dams from the ground can provide a good basis for an inspection. Photographs of icicles and remaining snow can provide a good starting point. Notes can help indicate if ice dams are occurring in a particular valley or on a certain roof area. Noting when water and/or ice starts forming indoors can also be of benefit. All of these can help focus the inspection, but may not help reveal where hidden insulation gaps or ceiling airtightness may be located, or the exact point at which water is entering.[1][3][5]
Noting the above and bringing it to the inspection to ask, “What above this area is causing the roof to be warmed?” may provide a good starting place. Photographs of gaps in insulation and leaking ductwork may also be of benefit. So, too, may a photo of the intended roof ventilation route. There should not just be a general call for more information. A blower-door test may be useful in locating hidden air leakage paths in conjunction with infrared imaging, if it is available.[1][2][4]
Fix heat escape without breaking the roof’s design
As for generally air sealing the ceiling first and then insulating it in a conventional, vented attic, I would agree. In the meantime, warm air can continue to flow through gaps and penetrations in the ceiling. Insulation may slow the flow of heat, but it will not eliminate the flow of air if there is no an air barrier. In the end, buried gaps in ceiling air sealing will remain, and may be harder to locate at a later time.[1][2]
The part of an attic insulation job I'd judge the most would be how well it blocks heat flow from the house into the attic. Usually the thickest layer of insulation is at the center of the attic and may hide thin layers around the edges. There needs to be both insulation and an air flow space in the eave's baffles. Bath exhaust and other ventilation ducts should discharge to the outdoors and equipment that introduces heat into the attic should be insulation and sealed off.[2][4]
Sealing a flue or chimney, or recessed lighting for that matter, is not a weekend caulking project. There are a lot of building code clearances and requirements that will govern what can be used. When a house is tightened and combined with a fuel-burning piece of equipment, combustion safety should be checked by the contractor.[1][2]
What about vents? They belong in the assessment, but they can’t substitute for controlling heat loss. Minnesota Extension emphasizes ceiling sealing and insulation and discourages mechanical attic ventilation as an ice-dam remedy in Minnesota. DOE also addresses the designed ventilation path. I don’t see a conflict: preserve the airflow a vented roof needs, without expecting a powered fan or extra vents to compensate for heat pouring into the attic.[1][2]
That advice changes if you have cathedral ceilings or an unvented roof. The insulation and air-control layers may follow the roof slope rather than an attic floor, and an unvented assembly may intentionally have no soffit-to-ridge airflow. Have the contractor identify your roof assembly before proposing vents or moving insulation. There’s no universal insulation thickness or vent layout for these retrofits.[2][4]
Different repairs buy different kinds of protection
| Proposed work | What it addresses | What it doesn’t establish |
|---|---|---|
| Air sealing, insulation correction, and attic heat-source repairs | Heat from the house reaching the roof | That solar-driven melting cannot occur |
| Ventilation-path correction in a vented assembly | Blocked or poorly functioning designed airflow | That ceiling leakage or insulation gaps are corrected |
| Professional snow or ice mitigation; purpose-designed heating cables | Snow available to melt or drainage obstruction | That the source of roof warming is corrected |
| Roof-detail repairs and ice-barrier membrane | Resistance to backed-up water entering the assembly | That ice will stop forming |
An ice-barrier membrane may be a good addition to the roof if other roofing work justifies the cost. Coverage, condition, and detailing are important; an ice-barrier membrane will not stop roof leaks. Likewise, other details may also need work; ask what defects support that work. A leak during the winter will not necessarily mean the entire roof needs to be replaced.[3][4]
Ask for evidence before, and after, the work
You may need more than one proposal to address stopping the leak, reducing the amount of heat lost to the roof, repairing the waterproofing, and addressing the damage done to the interior of the building. The costs of the proposals should correspond to the issues noted in the inspection. It’s also very important that wet materials be completely dried and assessed before the ceiling is closed and painted. Paint tells you very little about what’s behind it.[1]
Keep photos of sealed openings, perimeter insulation and ventilation channels before the work gets concealed. Compare snowmelt and leakage during the winter events, not just the outcome of whether it stayed dry during the season. I would appreciate a mild winter, but wouldn’t give the repair all the credit. A field study of three condominium complexes in the City of Ottawa, revealed that interpretation of repair results, was complicated by the effects of weather conditions and other heat sources. That small case series, is not a house repair success rate estimate.[2][5]
After good enclosure work, it is still possible to get ice dams. If that happens, do not assume the work was a failure. Take photos and notes of time and location, like you should be doing if you still have leakage. If you are still having indoor moisture issues, arrange for an immediate reassessment, and take more photos to show the conditions and time. You will have a better question than “Why do I still have icicles?”, “What is happening on this roof section, under these conditions?”.[3][5]
Sources and references
- University of Minnesota Extension: Dealing with and preventing ice dams
- DOE Building America Solution Center / Pacific Northwest National Laboratory: Attic Air Sealing, Insulating, and Ventilating for Ice Dam Prevention (2021-09-30)
- Building Science Corporation: BSD-135: Ice Dams (2006-10-29)
- DOE Building America Solution Center / Pacific Northwest National Laboratory: Construct Roofs and Attics for Ice Dam Prevention
- ASHRAE Buildings IX conference; paper by Mark Lucuik and William C. Brown, hosted by Oak Ridge National Laboratory: Ice Damming: Case Studies in Diagnosis and Remediation (2004)