
TL;DR
- Windows account for 25% – 30% of residential heating and cooling energy use, but DOE says improving existing windows can be the more cost-effective move when the units are still in good condition. (energy.gov)
- Use caulk for fixed gaps and weatherstripping for movable parts. Using the wrong material is one of the easiest ways to spend time and money without actually fixing the draft. (energy.gov)
- Simple air-sealing work can pay back quickly. DOE says caulking and weatherstripping often offer returns on investment in about a year or less. (energy.gov)
- If drafts, moisture on windows, or room-to-room hot and cold spots continue after basic fixes, the problem may be bigger than the window itself. (energystar.gov)
A cold seat by the window, a bedroom that bakes in late-afternoon sun, and a thermostat that keeps creeping upward are often treated as separate annoyances. Usually, they are parts of the same money problem: weak window performance. DOE says heat gain and heat loss through windows are responsible for 25% – 30% of residential heating and cooling energy use, but it also says improving existing windows can be the more cost-effective path when the windows are still in decent shape. (energy.gov)
That matters because not every uncomfortable window needs replacement. A comfort problem can come from a gap around the frame, worn weatherstripping on a moving sash, heat moving through cold glass, or a broader pressure or insulation issue that only shows up near the window. The checklist below is meant to sort those causes before you pay replacement-window prices for what may only be a sealing job. (energy.gov)

Start with the FRAME-10 Draft Score
Prior to purchasing anything, you should rate the specific problem window on a scale from 0 to 10 with respect to (use “5” for your rating criteria): Feel, Rattle, Air Path, Moisture, and Exposure. The objective is clear – to divide between a minor, inexpensive nuisance and an issue that requires a larger financial investment for the benefit of the room or room’s level of comfort.
| Category | 0 points | 1 point | 2 points |
|---|---|---|---|
| Feel | No obvious cold or hot wash near the window. | You notice a temperature edge only when you stand close. | You feel a steady cold draft in winter or a strong warm wash in summer where people actually sit. |
| Rattle | Window feels solid when latched. | Slight movement when pressed. | Noticeable movement, vibration, or loose meeting rails when locked. |
| Air path | Trim, caulk, and seals look intact. | Small crack, minor worn seal, or one questionable corner. | Visible gap, daylight, missing seal, or clearly failed caulk or weatherstripping. |
| Moisture | No recurring moisture signs. | Occasional condensation only in extreme weather. | Recurring condensation, peeling paint, stained trim, or soft wood around the window. |
| Exposure | Low-use room with limited sun or wind. | Frequently used room or challenging orientation. | Main living or sleeping space with prevailing wind, strong west sun, or both. |
Interpreting Your Window Score: If your score is 0-2, it indicates that you can use different types of coverings on your current windows and monitor their effectiveness. If the score is 3-5 you should first attempt adjustments such as caulking and/or weather stripping to your windows before considering any other types of window coverings, such as a new storm window or insert. If the score is 6-7 it may be beneficial to price a stronger comfort upgrade such as a storm window, insert or insulating shade. If your score is 8-10 it may indicate that your window restricts how you use your room daily and may warrant requesting cost estimates for window repairs or replacement, or a whole house assessment if multiple windows have this issue.
Tip: Use the $500-before-$5,000 rule: do not jump to replacement quotes until you have scored the window, sealed obvious leaks, and retested once. The exception is clear water damage, rotten parts, or windows that no longer operate safely.
The 20-minute room-by-room draft sweep
- Pick a day when the problem is obvious. DOE suggests a cool, very windy day when leaks are easier to detect. (energy.gov)
- Close and lock the window, then test for movement. If it rattles when latched, DOE says that movement can mean air leakage. (energy.gov)
- Look for daylight, cracked exterior caulk, brittle interior sealant, or worn weatherstripping around the sash and frame. DOE specifically recommends checking both caulking and weatherstripping for gaps and condition. (energy.gov)
- Use the simplest leak test first. A damp hand can find cool drafts, and DOE also recommends carefully using an incense stick around common leak sites if you need a clearer read. (energy.gov)
- Separate fixed gaps from moving gaps. DOE’s rule is straightforward: caulk stationary joints such as trim and frame cracks; weatherstrip operable windows and other moving parts. (energy.gov)
- Do one outside pass. DOE recommends inspecting places where different building materials meet, plus the perimeter around windows and doors, because the leak may be outside the sash itself. (energy.gov)
- Take note of the room, score and cost of the draft in your home: cold couch, children’s room that is too hot, guestroom nobody uses, home office requiring a heater; focus on making comfortable rooms that impact your life instead of just looking at the windows you think are the oldest.
What the symptoms usually mean
| What you notice | Likely issue | Best first move | Escalate when |
|---|---|---|---|
| You can see daylight or the sash rattles when locked. (energy.gov) | Air leakage at the sash or frame. | Adjust the latch, replace weatherstripping, and seal any fixed trim gaps. | If the window still moves after adjustment or no longer closes squarely, get a repair quote. |
| Cracked caulk where trim meets siding or interior casing. (energy.gov) | Failed seal at a stationary joint. | Recaulk the fixed gap with the right material. | If the joint keeps reopening, inspect for movement, rot, or installation problems behind the trim. |
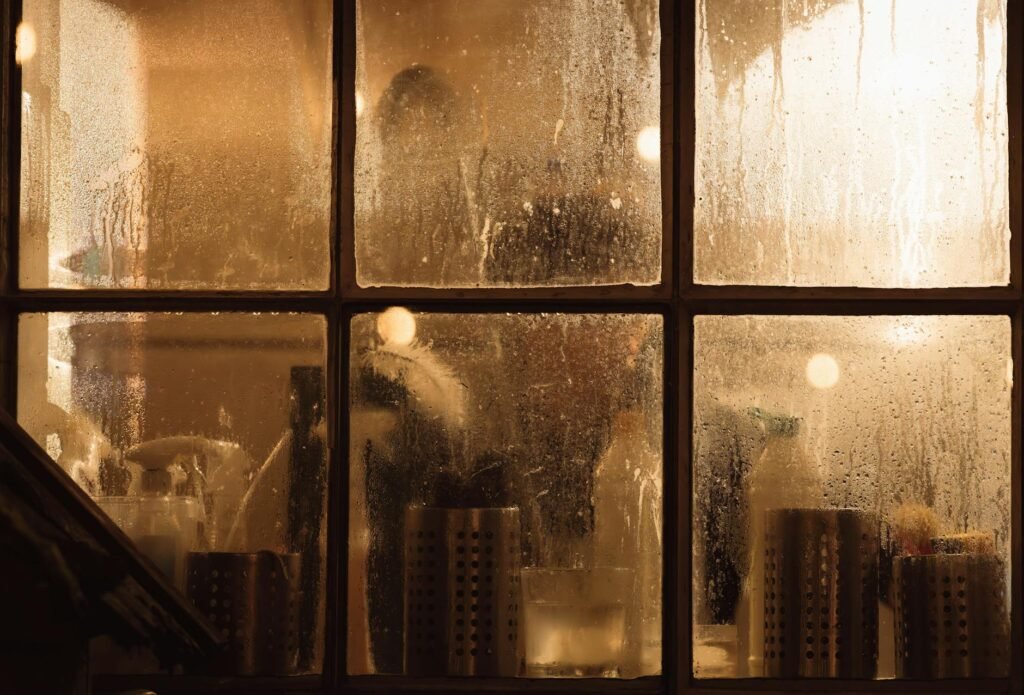
| Condensation on the room-side glass in winter. (epa.gov) | Cold glass, indoor humidity, or both. | Reduce moisture, improve coverings, and consider a storm window or better attachment. | If trim stays damp, paint peels, or mold appears, treat it as a moisture problem, not just a draft. |
| The room overheats on sunny afternoons, especially on west- or south-facing windows. (energy.gov) | Solar heat gain more than air leakage. | Use shades, drapes, or film suited to the climate and exposure. | If the room is still uncomfortable, compare attachments, storm windows, and replacement options by label. |
| The window is old single-pane, but the frame is still solid. (energystar.gov) | Poor insulation through the glass, not just leaks. | Price storm windows, inserts, or insulating shades before replacement. | If several main rooms have the same issue, collect replacement quotes for comparison. |
| The sill, sash, or trim is soft, stained, or deteriorated. (energystar.gov) | Water intrusion plus weak air sealing. | Move straight to repair or replacement discussions. | If water may be getting into the wall, ask for flashing and moisture inspection, not cosmetic caulk. |
Notice the order. DOE’s guidance starts with leak detection and lower-cost upgrades to existing windows, then moves to coverings, storm windows, and replacement if the condition or performance warrants it. That order is what protects your budget. (energy.gov)
A realistic household example with numbers
Suppose a family in a 1,700-square-foot house gets a contractor quote of $9,600 to replace eight aging windows after a rough winter start. Instead of signing, they score the rooms first. The north-facing living room window scores 8 because the couch area feels cold every evening. A west-facing bedroom scores 6 because of afternoon overheating. A dining room window scores 3 and is mostly an annoyance. They spend $32 on paintable caulk for fixed trim cracks, $24 on V-strip weatherstripping, $38 on two clear film kits for the coldest windows, and $165 on one tight-fit cellular shade for the living room. Total outlay: $259.
After the fixes, the living room drops from an 8 to a 4 on the FRAME score and the bedroom drops from a 6 to a 3. If similar cold-weather bills fall by even $18 a month over five colder months, that is about $90 a year in energy savings, plus a room the family will actually use again. That is not a guarantee, but it shows the decision logic: diagnose first, spend lightly, then reserve bigger money for the windows that still fail the test.
- The family did not try to solve the whole house all at once.
- They spent the most on the room with the highest comfort penalty.
- They accepted that one purchase, the cellular shade, was partly about comfort rather than the fastest payback.
- They kept the replacement quote in reserve instead of treating it as the automatic answer.

When a cheap fix will not be enough
If you seal obvious leaks and the room still feels wrong, widen the diagnosis. DOE says a blower door test is the thorough way to measure air leakage, and ENERGY STAR flags drafts, hot or cold spots, moisture on windows, high utility bills, dust, and noise as signs that the home may not be performing as it should. In plain terms, the window may be where you feel the problem, but not where the problem starts. (energy.gov)
This is also where backup options matter. For windows that are structurally sound but uncomfortable, DOE points to several middle-ground upgrades before full replacement: low-e exterior or interior storm windows can save 12% – 33% on heating and cooling costs depending on the existing window; tightly installed cellular shades can reduce heat loss through windows by 40% or more in heating season, which DOE says can equate to about 10% heating energy savings; and DOE recommends tightly sealed clear plastic film as a cold-weather fix for drafty windows. Interior storm panels and inserts can also be a practical option for renters or owners facing HOA or historic-district limits, though operability and emergency egress need attention. (energy.gov)
The personal-finance takeaway is simple: there is a wide middle ground between “live with it” and “replace every window.” That middle ground is often where the best value is.
Common mistakes that waste money
- Caulking a part that still needs to move. DOE is clear that operable windows need weatherstripping, not a bead of caulk that locks the problem in place. (energy.gov)
- Assuming condensation always means outside air is leaking in. EPA notes that indoor moisture condenses on cold window surfaces, and recurring moisture can encourage mold. (epa.gov)
- Replacing every old-looking window because one room feels bad. DOE says existing windows in good condition may be improved more cost-effectively rather than immediately replaced. (energy.gov)
- Ignoring soft trim, peeling paint, or degraded sills. ENERGY STAR notes that degraded windows can leak water into walls, which is a repair problem before it becomes an efficiency project. (energystar.gov)
- Testing on a mild day, deciding the problem is fixed, and then being surprised during the next weather swing.
- Buying replacement windows without checking labels, climate fit, or installer paperwork. ENERGY STAR and NFRC labels are there to help you compare actual performance, not sales language. (energystar.gov)
How to verify the fix before you spend more
- Re-score the same window with FRAME-10 after the fix. If the score barely changes, do not assume the job worked just because the material is new.
- Check comfort where people sit, not only at the thermostat. A room can read acceptable overall and still feel miserable at the sofa, desk, or bed.
- Use your utility’s usage data if available. Compare kWh or therms across similar weather periods rather than judging only by the dollar amount on one bill.
- If you shop for replacements, insist on the NFRC label and a climate-appropriate ENERGY STAR product. NFRC ratings let you compare U-factor and SHGC, and ENERGY STAR requirements vary by climate zone. (energystar.gov)
- If several rooms still fail after basic fixes, move to a professional energy assessment or blower door test instead of guessing your way through more purchases. (energy.gov)
For replacement shopping, the two label numbers that matter most are usually U-factor and SHGC. ENERGY STAR explains that a lower U-factor means better insulation, while a lower SHGC blocks more unwanted solar heat. Those are the numbers that help you match the product to the discomfort you are actually trying to solve. (energystar.gov)
Warning: This article is general information, not contractor or safety advice. If you find water intrusion, rotted trim, painted-shut or nonworking windows, mold, or any concern involving fuel-burning appliances, bring in a qualified contractor or home energy assessor. DOE warns that air sealing should be done with attention to ventilation needs and combustion-appliance backdraft risk. (energy.gov)
Bottom line
When it comes to fixing a draughty window, the best solution isn’t necessarily going to be an expensive one. First, you should assess the whole room, determining where you’re losing air by looking for gaps or cracks in the exterior wall and identifying how much comfortable temperature can be maintained by the window itself. Then apply the least expensive solution that solves your comfort issue on a first assessment without additional testing. If your window rates poorly after following this process, you may wish to explore options like adding insulation and/or using a better-quality window acting more like glass would, thereby making your investment more efficient. Following this procedure can often help you prevent comfort issues that lead to costly, avoidable purchase decisions.
FAQ
How do I know whether I need caulk or weatherstripping?
Use a fixed-versus-moving rule. DOE says caulk is for cracks around stationary components such as frames and trim, while weatherstripping is for movable parts such as operable windows and doors. (energy.gov)
Are plastic window kits actually worth trying?
As a seasonal fix, yes. DOE recommends tightly sealing clear plastic film or a heavy-duty clear plastic sheet over drafty windows during cold months to reduce infiltration. It is most useful when the frame is basically sound but still leaky. (energy.gov)
What can renters do if they cannot replace the windows?
Look at removable options first: clear film, tighter drapes or shades, and interior storm panels or inserts. DOE-backed guidance says interior storms and insulating panels can be a good option for renters or people limited by HOAs or historic rules, though you need to think about operability and egress. (energy.gov)
Does feeling cold near a window mean I need new windows?
Not necessarily. DOE says that if existing windows are in good condition, improving them can be the more cost-effective option. Replacement becomes easier to justify when comfort remains poor after sealing and attachment upgrades, or when the window is degraded or unsafe. (energy.gov)
What labels should I check if I do shop for new windows?
Start with the NFRC label and then confirm the product is ENERGY STAR certified for your climate zone. ENERGY STAR says the NFRC label helps you compare U-factor and SHGC, and its certification rules vary by climate. (energystar.gov)
Is condensation on the inside of the glass proof of a draft?
No. EPA explains that in cold weather, moisture in indoor air can condense on cold window surfaces. That can point to cold glass, excess indoor humidity, or both, and recurring moisture can encourage mold growth. (epa.gov)
References
- U.S. Department of Energy – Update or Replace Windows – https://www.energy.gov/energysaver/update-or-replace-windows
- U.S. Department of Energy – Air Sealing Your Home – https://www.energy.gov/energysaver/air-sealing-your-home
- U.S. Department of Energy – Detecting Air Leaks – https://www.energy.gov/energysaver/detecting-air-leaks
- U.S. Department of Energy – Energy Efficient Window Coverings – https://www.energy.gov/energysaver/energy-efficient-window-coverings
- U.S. Department of Energy – Windows, Doors, and Skylights – https://www.energy.gov/energysaver/windows-doors-and-skylights
- U.S. Department of Energy – Fall and Winter Energy-Saving Tips – https://www.energy.gov/energysaver/fall-and-winter-energy-saving-tips
- U.S. Department of Energy – Do-It-Yourself Home Energy Assessments – https://www.energy.gov/energysaver/do-it-yourself-home-energy-assessments
- ENERGY STAR – Independently Tested and Certified Energy Performance – https://www.energystar.gov/independently-tested-and-certified-energy-performance
- ENERGY STAR – High Performing Windows or Storm Windows – https://www.energystar.gov/products/energy_star_home_upgrade/windows_and_storm_windows
- U.S. Environmental Protection Agency – Mold and Your Home – https://www.epa.gov/mold/mold-and-your-home
- U.S. Environmental Protection Agency – What are the main ways to control moisture in your home? – https://www.epa.gov/mold/what-are-main-ways-control-moisture-your-home
- DOE / Pacific Northwest National Laboratory – Storm Window and Insulating Panel Utility Playbook – https://www.energy.gov/sites/default/files/2023-01/SWIP%20Utility%20Program%20Playbook.pdf